QM Product Spotlight
Metrology interface
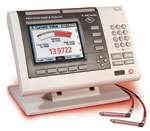 The P-400 DRO Metrology Interface is an advanced multi-function gaging terminal that is ideal for air/electronic and electronic gaging systems. Offering intuitive visual displays, the P-400 can apply mathematical formulas to measurement data from up to 16 output channels for on-the-spot analysis. It offers SPC analysis from an integrated database, dynamic min/max measurement reporting, and connectivity to PCs and other peripherals. Operators get visual feedback from an easy-to-read interface with a choice of graphical formats. The P-400 instantly reports pass/fail performance details for critical part dimensions, and can store, retrieve, and manage measurement data on the shop floor.
Precision Gage & Tool,
Touch trigger probes

Brown & Sharpe Tesastar Touch Trigger Probes feature an adjustable measuring force to prevent inadvertent triggering when a long stylus is used. Clockwise rotation increases the trigger force by 0.1N to approximately 0.3N. The probe force is pre-set at the factory to 0.11N, based on using a 21-mm long stylus fitted with a 3 mm diameter ball tip. The Tesastar-i configuration is adjustable to 168 positions in 15-degree increments. Probe and head are combined into a single unit for durability. The probes can be mounted on any CMM and provide the efficiency of a motorized probe in a manual setup.
Brown & Sharpe, a division of Hexagon,
On-machine inspection
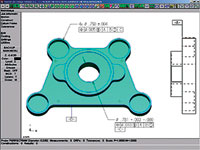 Metrolosys 9 software for on-machine inspection transforms machine tools into CMMs. Users can implement a quality process during machining, which allows critical errors in design, CNC programming, or setup to be caught on-the-fly. Full GD&T inspection procedures can be created and GD&T inspection reports can be generated directly from the CNC machine tool touch probe. Any CNC milling machine that is probe-ready can take advantage of these capabilities. Calibration is performed using Optodyne's error mapping laser system. The software provides independent volumetric error mapping, advanced high-speed probing methods, and automatically generates Inspection G-code.
Shadow Automation Inc.,
Large travel
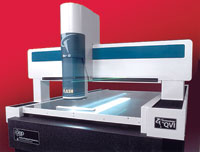 The SmartScope Flash 1500 offers a 36"x60"x8" XYZ travel in a floor stand system with moving bridge design. The instrument head moves along a steel bridge in the X axis and the entire bridge moves on parallel tracks in the Y axis. The staged part remains stationary, while optics/bridge translations are performed rapidly with positioning accuracy. Its measuring range makes it suited for measuring large parts such as plasma display panels, large metal or plastic modules, LCDs, and circuit boards. AccuCentric 12x zoom lens is automatically calibrated at every magnification change.
Optical Gaging Products Inc.,
In-process inspection
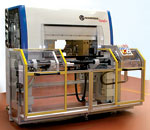 M110 Optoflex measuring machine for the dimensional inspection of shafts and shaft-like parts can be integrated into a production line for inter-operational or final inspection of parts with the possibility of feedback to the machine tool. It can also be used as an audit station or for post-process inspection applications. The use of shadow cast optoelectronic technology—an alternative to the traditional contact and air-to-electronic solutions—allows measurements to be performed without touching the part, so that several part types can be checked without any operator intervention. The M110 Optoflex utilizes infrared optoelectronic probes (CCD).
Marposs Corporation,
3D measuring
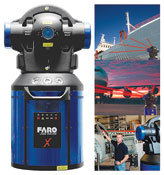 The FARO Laser Tracker X is a portable, 3D measurement system that measures large-scale parts, tooling, and machinery. The system measures XYZ coordinates with its laser by following a hand-held mirrored spherical probe. The 3D position of the probe is reported in real-time by high-accuracy angular encoders and the new XtremeADM feature, which eliminates the need for an interferometer to measure distance. The XtremeADM feature also enables the tracker to overcome line-of-sight issues. If an object comes between the beam and the probe, the user can immediately relocate the beam and continue measuring rather than going back to a stable point.
FARO Technologies Inc.,
editor's blogs

Off the Toolpath
EASTEC marks 30th show with spotlight on medical devices
The recession hasn’t stopped business, if the activity at the EASTEC Advanced Productivity Exposition is to judge. The show, in its 30th year, drew 570 exhibitors, down from 608 in 2008 and 650 in 2007. About 15,000 attendees pre-registered. Last year’s show tallied 14,000 attendees. The largest industrial tool trade show on the East Coast, EASTEC was held May19-21 in West Springfield, MA.
by Dennis Seeds, Editor-in-Chief
digital edition
On target
For a new generation of parts, automated centerless grinding fills the bill
The taper test
Prototype fixture finds the reason why vexing toolholder wear marks appear
Watchful eye keeps tabs on 575 machine tools
Aerospace supplier sees new productivity heights, lower costs
From 12 hrs to 25 mins
Giant steps for faster cavity hogging, square-offs follow re-tooling